Festési útmutató
Hogyan kell használni a festéseket az LFS-ben
Az újoncoknak itt egy rövid útmutató arról, hogyan kell használni a festéseket a játékban.
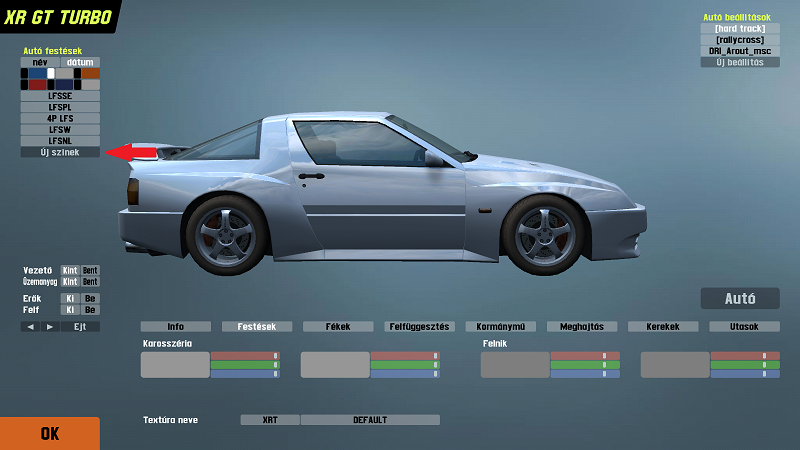
1. Készíts egy új színt az "Új színek" megnyomásával - ez átírányít a festés-választó oldalra
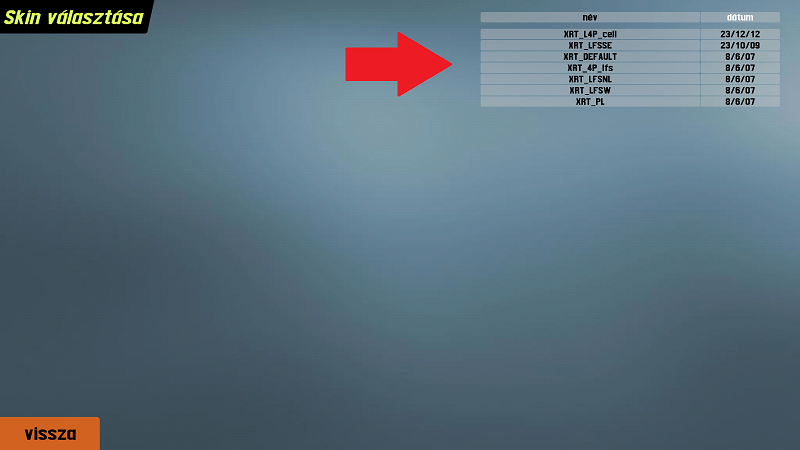
2. Válaszd ki a festés a listáról (ha nem látod a festésedet, ellenőrizd le, hogy a LFS_MAPPA/data/skins mappában van-e!)
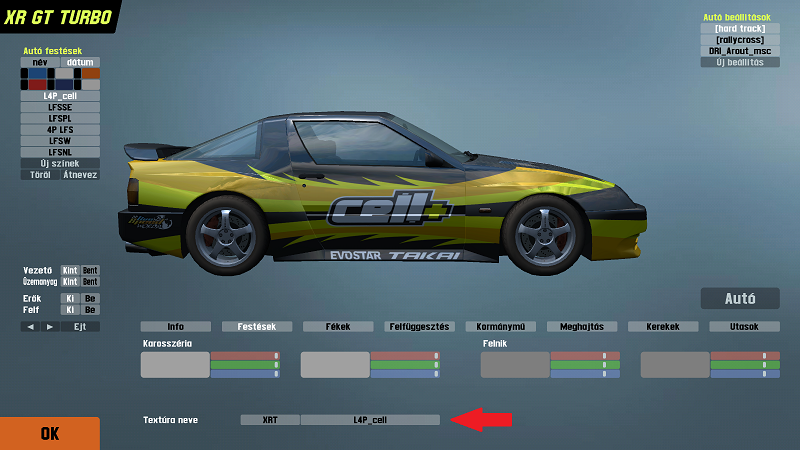
3. Azt a festést amit kiválasztottál, a 'Textúra Neve' mellett kellene látnod. Mostmár használhatod a festésedet versenyzéskor.
Demo Felhasználók: Csak S1/S2 felhasználóknak van lehetősége festéseket feltölteni a LFS World-ön keresztül (csak így látják mások is a festésedet). Megkérheted őket, hogy feltöltsék a festésedet. A LFSForum-on kérni a festéseket hogy feltöltsék - nem megengedett.
S1/S2 Felhasználók: A LFSWorld-be bejelentkezéssel és a "My online car-skins" kiválasztásával feltöltheted a festéseidet, hogy elérhető legyen a többieknek is, hogy letöltsék (hogy lássák a többiek is). A festéseket, amiket a LFS World-re töltesz fel, muszáj 1024 x 1024 felbontásúnak lennie, de használhatsz nagyobbat is (2048 x 2048) a LFS_MAPPA/data/skins mappádban.
Végül, egy festés átcsinálása a készítő engedélye nélkül elég durva dolog, ez lopásnak van minősítve. Továbbá bármilyen meztelen, pornográf, rasszista vagy bármilyen más nagyon sértő tartalom a festésedben nem engedélyezett.
Hogyan készítsek egy festést?
Jó tudni
Let's get right down to the facts so we can move on to actually making and using custom skins.
- Each car in LFS is a 3D model with a texture "wrapped" around it. In the case of LFS that texture is a JPG file, this image format was developed for use on the Internet and is therefore very common. LFS skins are JPG files, nothing any more complicated than that.
- Every decent (and many poor) graphics and paint programs support the JPG format. This makes skinning very easy in LFS because anyone can have a go. JPG images are easy to create and edit, and they use compression to reduce file size, helping to improve performance by minimising the load on PC harware resources.
- LFS contains default skins which can be "painted over" in your favourite paint or graphics program, and saved as skins in JPG format for use in LFS. That's as simple as skinning really can be. You can find the default skins in your LFS/data/skins folder. Look for the plain white skins with no design on them.
- LFS skins have a special naming prefix for each car, you will notice this prefix in the skin name, for example: FZR_DEFAULT.jpg. The FZR_ prefix must be used for FZR cars if you want the game and LFS World to handle the textures (skins) properly. Apart from this technical reason, it makes good sense to have everyone using the same naming convention for skins. All cars each have their own 3-letter filename prefix followed by an underscore, check your skins folder and you will see how it works.
Az alap módszer egy festés elkészítésére
Ok this is really basic, but if you are new to skinning this will get you started:
- Launch your graphics or paint program (recommended: Paint Shop Pro, Photoshop. Not recommended: Windows Paint).
- Go to file/ open, browse to your LFS/data/skins folder and choose a default skin (plain white) for the car you wish to paint. Click Ok.
- Using the paint and effects tools provided with your software you can paint the skin and create a design for your car. You may also cut and paste other images on to your skin. Sponsor logos are popular additions, as are racing stripes and numbers, your country's flag and things like that. Don't stop until you are very satisfied with the quality of your work. It is a good idea to stretch the skin to the ratio 1280*1024 before editing so it equals your real car measures. After you are finished, change it back.
- Go to file/ save as, and make sure that the file type selected is JPG. Name your skin using the three-letter prefix, include the underscore. Don't use a common name like XFG_HONDA, be more unique. Don't use special characters in your filenames, keep it simple.
Making sure that you are saving to your LFS/data/skins folder, click Ok to save your JPG file.
There. You just made your first skin! I hope you put more time and effort into the next one, below are some tools and information to help you do your best. Please check our other tutorial topics for more advanced techniques and considerations.
Hogyan töltsük fel a festésünket a LFS World-be?
- Menj a www.lfsworld.net weboldalra és jelentkezz be a felhasználóneveddel és a jelszavaddal
- Dupla-katt a "My online car skins"-re
- Kattints a 'browse'-ra
- Válaszd ki a jpeg festésedet (nem nagyobbat 1024 x 1024-nél)
- Kattints az 'upload skin'-re
- Menj online módba (többjátékos) és élvezd azt, hogy mindenki látja a festésedet
Hogyan szerezzünk további festés-feltöltőhelyeket?
Alapból, az S1 felhasználók 25, míg a S2 felhasználók 50 feltöltőhelyet kapnak. További helyeket vásárolhatsz a "My online car-skins" oldalon - klikkelj az "increase" gombra (megnövelés) az oldalon. 50 helyet vehetsz £1-ért (kb. 360 Forint).
Hasznos linkek
- Adobe Photoshop
- Adobe Fireworks
- Corel (Jasc) Paint Shop Pro
- The GIMP (ingyenes szoftver)
- Pixlr (egy ingyenes photoshop program online)
- Inkscape
- ObjectPainter
- Paint.net
- PhotoFiltre
- Xara Xtreme
- brandsoftheworld (támogató logók a festéseidre)
- Master Skinnerz (festési források, mint pl. sablon)
Feltöltő-szolgáltatások a LFS festésekhez


